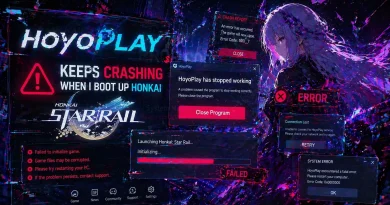
Error Code 220 Marvel Rivals — 10 Fixes in 2026
You’ve locked in your hero. Your team comp is perfect. Spider-Man is flanking, Iron Man is providing air support, and you’re about to pop off — when the screen freezes and slaps you with this:
“Error Code: 220”
Your match is gone. Your team is short a player. And you’re staring at a login screen, wondering what just happened.
Marvel Rivals error code 220 is one of the most frustrating disconnection errors in the game right now — and it’s hitting players across PC, Steam, and console harder than a Hulk ground pound. Whether it hits at startup, mid-match, or right when you’re climbing the ranked ladder, error 220 has a nasty habit of showing up at the worst possible moment.
But here’s the deal: this error is fixable. Almost every case of error code 220 in Marvel Rivals traces back to a handful of well-documented causes — and once you know what you’re dealing with, the solution is usually fast.
In this guide, you’ll get the full breakdown of what Marvel Rivals error 220 is, exactly why it happens, and 10 battle-hardened fixes that actually work. We’re not wasting your time with generic “restart your router” advice without context. Every fix here is specific, step-by-step, and targeted at the real causes behind this error.
Hero up. Let’s squash this error and get you back in the fight.

What Is Error Code 220 in Marvel Rivals?
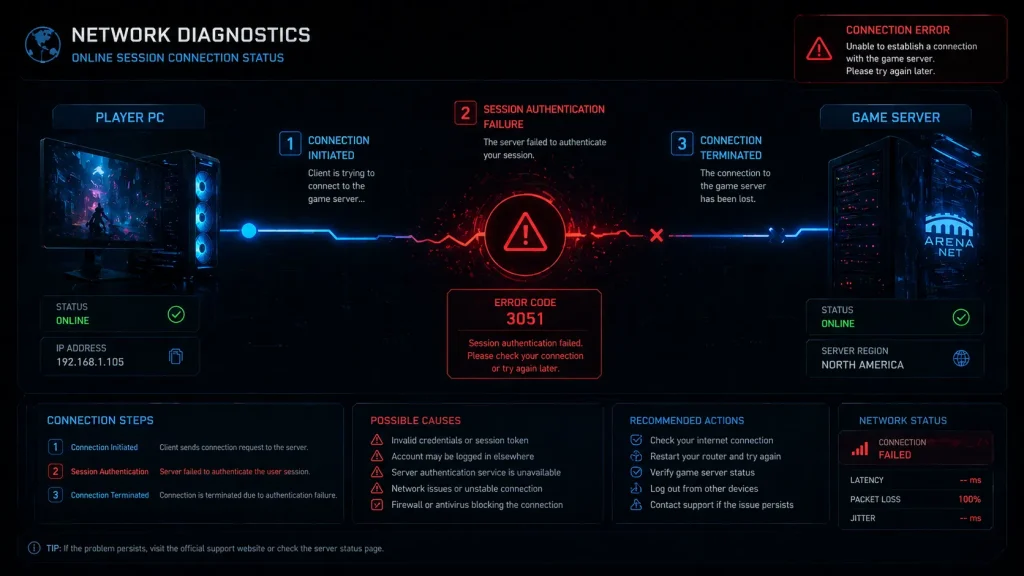
Error code 220 in Marvel Rivals is a server authentication and session connection failure. It’s thrown by the game when the client loses its connection to NetEase’s backend servers — or fails to establish one in the first place.
You’ll typically see it displayed as:
“Error Code: 220 — Connection to server failed”
Or variations like:
“Unable to connect to the server. Please check your network connection. (220)”
The error can appear at multiple points in your session:
- At the main menu, before you can even enter a lobby
- During matchmaking — while queuing for a game
- At the loading screen — just before entering a match
- Mid-match — the most painful version, kicking you out of an active game
- After a match, blocking you from receiving rewards or returning to the lobby
Error 220 is specifically a network-layer failure between your game client and Marvel Rivals’ game servers. Unlike client-side errors (crashes, freezes), error 220 means the game is running fine on your end — but the connection handshake between your PC and NetEase’s servers broke down.
What Does Error Code 220 Actually Mean Under the Hood?
Let’s get a little technical — because understanding the “why” makes the fixes make sense.
Marvel Rivals is a fully online, session-based hero shooter built by NetEase Games. Like all live-service games of this type, it requires a persistent authenticated connection to its game servers to function. This connection handles:
- Account authentication and session tokens
- Matchmaking queue management
- Real-time gameplay data synchronization
- Anti-cheat verification loops
- Post-match stat recording and reward distribution
Error code 220 specifically triggers when one of these connection sequences fails to complete or drops unexpectedly. The game client either:
- Never receives a valid authentication response from the server
- Loses an established connection mid-session
- Receives a rejection from the server due to a version mismatch, regional routing issue, or server-side problem
Think of it like trying to call someone on the phone. Error 220 isn’t “the number doesn’t exist” (that would be a different error) — it’s “the call connected but then dropped immediately.” Something between you and the server is breaking the line.
Now let’s find out what that something is — and fix it.
Root Causes of Marvel Rivals Error Code 220
Before you start smashing buttons, narrow down your cause. Error 220 in Marvel Rivals has several distinct triggers:
Server-Side Causes:
- NetEase game servers are experiencing outages or maintenance windows
- Regional server overload during peak hours or new season launches
- Backend patches temporarily disrupting active sessions
- Server-side hotfixes are causing brief authentication failures
Network-Side Causes:
- Unstable internet connection with high packet loss
- Wi-Fi interference is causing intermittent disconnections
- ISP routing issues affecting NetEase server endpoints
- DNS cache returning stale or incorrect server address data
- VPN rerouting traffic through flagged or incompatible IP ranges
- Required game ports blocked by router or ISP firewall
Local Client Causes:
- Outdated Marvel Rivals game client version
- Steam authentication failure affecting the Marvel Rivals session
- Firewall or antivirus blocking Marvel Rivals’ network processes
- Corrupt game installation files are breaking connection routines
- Outdated network adapter drivers are causing packet transmission failures
Let’s kill each other.
Fix 1: Check Marvel Rivals Server Status — Don’t Skip This Step
Before you touch a single setting on your PC, spend two minutes checking the servers.
Seriously. This is the most important first step and the one most players skip because they assume it’s their own problem. But Marvel Rivals server issues — especially during new season drops, balance patch deployments, and peak weekend hours — cause widespread error 220 that no local fix will touch.If you are facing similar login or connectivity problems in other games, you may also want to check our guide on
Failed to Connect to Steam Error Code 211 fix, which covers similar network and authentication-related issues that often appear in online multiplayer games.
Trying to fix a server outage with DNS flushes is like fixing a power outage by changing your light bulbs. Save the effort.
How to check Marvel Rivals server status:
- Visit downdetector.com and search “Marvel Rivals” — player reports spike immediately during outages, often within minutes of issues starting
- Check the official Marvel Rivals Twitter/X account (@MarvelRivals) — the team posts maintenance notices and server disruption alerts in real time
- Check the Marvel Rivals subreddit (r/MarvelRivals) — the community lights up fast when servers go down
- Join the official Marvel Rivals Discord server — pinned announcements cover active outages and ETAs for restoration
Look for these specific patterns:
- Multiple players reporting error 220 simultaneously = server issue
- Error 220 appearing right after a game update = patch-related instability
- Error only affecting your region, while others play fine = regional server issue
If the servers are down, sit tight. NetEase typically resolves unplanned outages within 1–3 hours. No local fix will help until they do.
Fix 2: Restart the Game and Steam Client — The Right Way
Look, we know this sounds basic. But there’s a right way and a wrong way to do this — and most players do it wrong.
Simply closing Marvel Rivals from the launcher and reopening it doesn’t fully clear the session state. Stale authentication tokens, expired session data, and lingering network socket connections from a previous failed session can persist in memory — causing error 220 to repeat on every reconnect attempt until they’re properly cleared. Some players also experience launcher-related errors when playing online games across different platforms. A similar case is the Epic Games error code 8028 fix, which explains how platform-side authentication issues can prevent games from launching properly.
You need a complete, clean restart that wipes all of that.
The correct restart sequence:
- Close Marvel Rivals completely — not just to the menu
- Press Ctrl + Shift + Esc to open Task Manager
- Check the Processes tab for any lingering processes:
- MarvelRivals.exe or MarvelRivals_Client.exe
- Steam.exe or steamwebhelper.exe
- Right-click any remaining processes and select End Task
- Wait 20–30 seconds — this matters, don’t rush it
- Restart Steam first and let it fully load
- Launch Marvel Rivals from your Steam library
- Let the game reach the main menu before attempting to queue
This sequence ensures a completely fresh connection attempt with no leftover session garbage contaminating the new connection. It resolves a surprising number of error 220 cases — especially those that appear after a mid-match disconnect.
Fix 3: Flush DNS Cache and Reset Your Network Stack

This fix is one of the most effective for persistent error 220 cases — especially when the error appears suddenly after the game was working fine, or after a Marvel Rivals server maintenance window.
Here’s what’s happening: your PC stores a DNS cache — a local record of server addresses it’s connected to previously. When Marvel Rivals or NetEase updates their server infrastructure (which happens frequently with live-service games), your DNS cache can hold onto old, now-invalid server addresses. Your game tries to connect to a server that no longer exists at that address, and gets error 220.
Flushing DNS forces your PC to fetch fresh, accurate routing information. The network stack reset clears any corrupted TCP/IP configurations that might be dropping packets.
Steps — run these in Command Prompt as Administrator:
- Press Windows + S, search Command Prompt
- Right-click > Run as administrator
- Type each command and press Enter after each:
ipconfig /flushdns
ipconfig /registerdns
ipconfig /release
ipconfig /renew
netsh winsock reset
netsh int ip reset
- Restart your PC after running all commands — this is mandatory, not optional
- Launch Marvel Rivals and test
The netsh winsock reset command deserves special mention. It resets Windows’ core network architecture to factory defaults — resolving a category of deep network stack corruption that standard troubleshooting can’t touch.
This fix resolves error 220 in a significant number of cases. Run it before moving to more complex solutions.
Fix 4: Switch to a Wired Connection
Wi-Fi is the silent killer of competitive gaming connections — and it’s a major contributor to Marvel Rivals error code 220.
Wireless connections are vulnerable to interference from other networks, household appliances, building materials, and distance from the router. These interference sources cause packet loss — brief moments where data packets between your PC and Marvel Rivals’ servers simply disappear. In a game that requires constant, low-latency data exchange like Marvel Rivals, even 1–2% packet loss is enough to trigger authentication failures and error 220.
The fix? Go wired. A physical Ethernet connection eliminates wireless interference entirely and provides the stable, consistent packet delivery that Marvel Rivals needs.
How to make the switch:
- Plug an Ethernet cable from your router directly into your PC or laptop
- On Windows 11/10: Go to Settings > Network & Internet — your wired connection should appear automatically and take priority over Wi-Fi
- Disable your Wi-Fi adapter temporarily to ensure Windows routes all traffic through the wired connection:
- Settings > Network & Internet > Advanced Network Settings
- Click your Wi-Fi adapter > Disable
- Launch Marvel Rivals and test
Test your connection quality first: Before assuming Wi-Fi is the issue, run a packet loss test:
- Visit packetlosstest.com while on Wi-Fi
- If you see any packet loss above 0%, Wi-Fi is contributing to your error 220 problem
Even if a permanent wired connection isn’t feasible, using one temporarily to confirm whether Wi-Fi is your culprit saves time on other fixes.
Fix 5: Disable VPN and Proxy Services
VPNs and gaming. It seems like a good idea — lower ping, bypass geo-restrictions, protect privacy. But in practice, running a VPN while playing Marvel Rivals is one of the most reliable ways to trigger error code 220.
Here’s why it happens. NetEase’s servers perform IP validation on connecting clients. Commercial VPN IP ranges are frequently flagged by anti-abuse systems — either because they’re associated with high-traffic routing, known proxy services, or previous abuse from other users sharing the same VPN server. When your traffic arrives from a flagged VPN IP, the server can drop or reject the authentication handshake — producing error 220 immediately.
Beyond intentional VPNs, Windows sometimes enables proxy settings through corporate software, network management tools, or even some antivirus packages — without you even knowing.
Turn off your VPN:
- Disconnect from your VPN fully — don’t just pause it
- Close the VPN application completely
- Check your system tray for any lingering VPN processes
- Restart your network connection
- Relaunch Marvel Rivals
Disable Windows Proxy Settings:
- Go to Settings > Network & Internet > Proxy
- Toggle Manual proxy setup to Off
- Toggle Automatically detect settings to Off
- Save and retest
Check Internet Options:
- Press Windows + R, type inetcpl.cpl, press Enter
- Click Connections > LAN Settings
- Uncheck “Use a proxy server for your LAN.”
- Click OK
If Marvel Rivals works after disabling your VPN but you use it for other reasons, try switching to a different VPN server — ideally, one geographically closest to your actual location and to Marvel Rivals’ nearest server region.
Fix 6: Whitelist Marvel Rivals in Firewall and Antivirus
Windows Defender and third-party security software are responsible for more Marvel Rivals error 220 cases than most players realize — and it’s one of the least obvious culprits because the game appears to launch normally before the error hits.
After every Marvel Rivals update, the game downloads new executable files and DLLs. Your antivirus scans these fresh files and frequently flags them as suspicious — especially network communication modules and anti-cheat components. When those files get blocked or quarantined, Marvel Rivals loses its ability to maintain a server connection and throws error 220.
Add Marvel Rivals to Windows Firewall exceptions:
- Open Windows Security > Firewall & Network Protection
- Click “Allow an app through firewall.”
- Click Change Settings (admin required)
- Scroll and find Marvel Rivals — ensure both Private and Public boxes are checked
- If it’s not listed, click “Allow another app.”
- Browse to your Marvel Rivals install folder (default: C:\Program Files\Steam\steamapps\common\MarvelRivals\)
- Add the main game executable
- Ensure both network types are checked
Create manual inbound/outbound rules:
- Open Windows Defender Firewall with Advanced Security
- Click Inbound Rules > New Rule > Program
- Browse to the Marvel Rivals executable
- Select Allow the connection > check all profiles > name it “Marvel Rivals.”
- Repeat for Outbound Rules
Add exclusions in your antivirus: Open your antivirus dashboard, find Exclusions or Trusted Applications, and add the entire Marvel Rivals game folder. After adding exclusions, restart both the antivirus and the game.
Check Windows Defender quarantine:
- Windows Security > Virus & Threat Protection > Protection History
- Look for any recently quarantined Marvel Rivals files
- Select quarantined items and choose Allow
Fix 7: Forward Ports for Marvel Rivals
Port forwarding is the heavy-lifting fix that permanently resolves error 220 for players whose router is actively blocking Marvel Rivals’ required network communication channels.
Marvel Rivals communicates through specific TCP and UDP ports. When your router’s firewall keeps those ports closed, every connection attempt is silently dropped — and error 220 appears every time the game tries to authenticate with the server.
Marvel Rivals required ports:
| Protocol | Ports |
| TCP | 443, 80, 7000–7999 |
| UDP | 9000–9100, 10000–10099 |
| UDP | 27000–27036 (Steam-related) |
| TCP/UDP | 3478, 3479, 4379, 4380 |
How to forward ports:
- Open your browser and navigate to your router’s admin panel:
- Most common addresses: 192.168.1.1, 192.168.0.1, or 192.168.100.1
- Log in with your admin credentials (often printed on the router label)
- Find Port Forwarding (may be under Advanced, NAT, or Virtual Servers)
- Create new rules for each port range above, pointing to your PC’s local IP
- Find your local IP by opening Command Prompt and typing ipconfig — look for IPv4 Address
Enable UPnP as an alternative: If manual port forwarding feels complex, enable UPnP (Universal Plug and Play) in your router settings. This allows Marvel Rivals to automatically negotiate the port access it needs without manual configuration.
- Log in to the router admin panel
- Find UPnP settings under Advanced or NAT
- Enable it
- Restart the router and test
Port forwarding also improves your NAT type — moving from Strict/Type 3 to Moderate/Type 2 or Open/Type 1. This not only reduces error 220 frequency but also improves matchmaking speed and connection quality across all online games.
Fix 8: Update Network Drivers and Marvel Rivals Game Client
Two “update” fixes that players consistently underestimate — and consistently solve problems when applied correctly.
Update Your Network Adapter Drivers
Your network adapter driver is the software bridge between Windows and your physical network hardware. Outdated drivers can cause packet transmission failures, inconsistent connection behavior, and authentication timeouts — all of which manifest as error 220 in Marvel Rivals.
Update network drivers:
- Press Windows + X > Device Manager
- Expand Network Adapters
- Right-click your primary adapter (Ethernet or Wi-Fi)
- Select Update driver > Search automatically for drivers
- Install any found updates and restart
For more reliable results, visit your motherboard or laptop manufacturer’s website and download the latest network driver directly. Manufacturer-sourced drivers are more up-to-date than Windows Update’s offerings.
Keep Marvel Rivals Updated
NetEase’s servers only accept connections from clients running the current game version. If you’re even one minor hotfix behind, the server rejects your authentication — error 220 shows up immediately.
Force update Marvel Rivals on Steam:
- Open Steam Library
- Right-click Marvel Rivals > Properties > Updates
- Set to “Always keep this game updated.”
- Check for pending updates manually
- Let any update be complete before relaunching
Verify game file integrity after updating:
- Right-click Marvel Rivals in the Steam Library
- Properties > Local Files
- Click “Verify integrity of game files”
- Allow scan to complete
- Relaunch and test
A partial or corrupt update that left mismatched files is a frequent trigger for error 220 — file verification catches this automatically.
Fix 9: Change Your DNS Server
Your DNS server translates Marvel Rivals’ server domain names into IP addresses your PC can connect to. Default ISP DNS servers are often slow, occasionally unreliable, and sometimes can’t resolve gaming-specific endpoints quickly enough — causing connection timeouts that produce error 220.
Switching to a faster, more reliable public DNS server — particularly one optimized for gaming — can meaningfully reduce connection failures.
Best DNS options for gaming:
| Provider | Primary DNS | Secondary DNS |
| Cloudflare (fastest) | 1.1.1.1 | 1.0.0.1 |
| Google (reliable) | 8.8.8.8 | 8.8.4.4 |
| OpenDNS (gaming-friendly) | 208.67.222.222 | 208.67.220.220 |
How to change DNS on Windows:
- Go to Settings > Network & Internet > Advanced Network Settings
- Click your active connection (Ethernet or Wi-Fi)
- Click Edit next to DNS server assignment
- Switch from Automatic to Manual
- Enter your chosen primary and secondary DNS values
- Click Save
Alternative method:
- Press Windows + R, type ncpa.cpl, press Enter
- Right-click your active connection > Properties
- Double-click Internet Protocol Version 4 (TCP/IPv4)
- Select “Use the following DNS server addresses”
- Enter your preferred DNS values
- Click OK and test
Combining a DNS server change with the DNS flush from Fix 3 gives you the maximum benefit — fresh routing data delivered to faster, more reliable servers.
Fix 10: Reinstall Marvel Rivals for a Clean Slate
You’ve tried everything. Error 220 is still there. Stubborn as Magneto refusing to side with the Avengers.
Time for the nuclear option: a complete clean reinstall.
A full reinstallation replaces every local game file — including any corrupt, outdated, or partially updated files that might be breaking Marvel Rivals’ ability to authenticate with the server. It also resets all local configuration files to factory defaults, eliminating any settings that might be contributing to connection failures.
Before reinstalling: Your account progress, unlocked heroes, and cosmetics are stored server-side on your NetEase/Marvel Rivals account — not locally. A reinstall will not cost you any progress.
Full clean reinstall on Steam:
- Right-click Marvel Rivals in the Steam Library
- Select Manage > Uninstall
- Once uninstalled, navigate to: C:\Program Files (x86)\Steam\steamapps\common\
- Delete any remaining Marvel Rivals folder
- Also clear: %localappdata%\MarvelRivals\ if it exists
- Restart your PC
- Reinstall Marvel Rivals from Steam
- Let the download complete fully — don’t launch mid-download
- Launch the game and test
Clear the Steam download cache before reinstalling:
- Steam > Settings > Downloads
- Click Clear Download Cache
- Log back in and proceed with reinstallation
A clean reinstall after clearing the download cache ensures Marvel Rivals is built from verified, uncorrupted files — eliminating the possibility of corrupt installation data causing persistent error 220.
Marvel Rivals Error 220 vs Other Connection Errors
Not all Marvel Rivals connection errors are equal. Knowing which error is which saves you from applying the wrong fix:
| Error Code | What It Means | Primary Fix |
| 220 | Session authentication/connection lost | Network fixes, server status check |
| 211 | Steam authentication failure | Steam restart, Steam server check |
| 10054 | Connection forcibly closed by remote host | Server-side issue, restart game |
| 10060 | Connection timeout | Port forwarding, firewall whitelist |
| 10061 | Connection refused by server | Server status, VPN disable |
| -1 | General connection failure | DNS flush, network reset |
Error 220 sits specifically in the session management failure category — it’s distinct from Steam authentication errors (211) and pure timeout errors (10060). This is why fixes specifically targeting your network configuration, DNS, and firewall are most effective for error 220.
Quick Reference Fix Table
| Fix | Best For | Time Needed | Difficulty |
| Check server status | Server outage | 2 minutes | Easy |
| Full restart sequence | Stale session data | 5 minutes | Easy |
| Flush DNS + network reset | DNS/stack issues | 5 minutes | Easy |
| Switch to a wired connection | Wi-Fi instability | 10 minutes | Easy |
| Disable VPN/proxy | VPN interference | 2 minutes | Easy |
| Firewall/antivirus whitelist | Security blocking | 10 minutes | Medium |
| Port forwarding | Router blocking | 20 minutes | Medium |
| Update drivers and game | Version mismatch | 15 minutes | Easy |
| Change DNS server | ISP DNS issues | 5 minutes | Easy |
| Clean reinstall | Deep corruption | 30–60 minutes | Medium |
Final Thoughts
Error code 220 in Marvel Rivals is one of those problems that feels personal — like the game is specifically trying to stop you from having fun. But in reality, it’s almost always a network handshake failure with a clear cause and a clear fix.
Work through these solutions systematically. Start with the fast checks — server status, clean restart, DNS flush — and escalate from there. The vast majority of players find their fix within the first four or five methods. For stubborn cases, port forwarding and a clean reinstall cover virtually everything else.
The battlefield needs your hero. Hulk doesn’t smash itself.
Now go fix that error — and carry your team to victory.
Many multiplayer games face similar server or connection errors beyond Marvel Rivals. For example, Dead by Daylight error code 8005 also occurs due to server or connectivity instability, and the fixes can help understand broader network-related issues in online games.