How to Fix Audio Renderer Error in Windows 11 (2026)
You’re watching a video on YouTube. Everything looks fine — until a red error banner ruins your session: “Audio Renderer Error. Please restart your computer.”
Frustrating, right?
This error is surprisingly common on Windows 11, and it stops audio playback dead in its tracks — especially in browsers like Chrome, Edge, or Firefox. The good news? You don’t need to be a tech wizard to fix it.
In this guide, you’ll get 10 proven, step-by-step methods to eliminate the audio renderer error on Windows 11 — from the simplest one-minute fixes to deeper driver-level solutions. Whether you’re a student, content creator, or office professional, this guide has you covered. If you’re experiencing broader system issues while gaming or streaming, you may also encounter the failed to connect to Steam error code 211, which is a common Windows audio-related connection failure.
Let’s dive in.
What Is the Audio Renderer Error?

The audio renderer error is a playback failure that typically appears as:
“Audio renderer error. Please restart your computer.”
It most commonly shows up on YouTube, but it can also appear on other streaming platforms, media players, and audio applications. The error means Windows 11 has lost communication between your browser or app and the audio output device — essentially, the software can no longer “render” sound to your speakers or headphones.
This is not a hardware failure in most cases. It’s almost always a software or driver-level conflict — which is good news because it means you can fix it yourself.
What Causes the Audio Renderer Error in Windows 11?
Understanding the root cause helps you pick the right fix. Here are the most common culprits:
- Corrupt or outdated audio drivers — Drivers act as translators between Windows and your audio hardware. When they’re outdated or broken, communication breaks down.
- Conflicting audio devices — If you have multiple audio outputs (speakers, headphones, Bluetooth, HDMI), Windows can get confused about which one to use.
- Browser-audio API conflicts (WASAPI issues) — Browsers like Chrome use the Windows Audio Session API (WASAPI). If another application holds exclusive control over the audio device, the browser gets blocked.
- Pending Windows 11 updates — A failed or incomplete system update can destabilize audio components.
- Third-party audio software — Tools like Realtek Audio Console, Nahimic, or virtual audio drivers can interfere with native Windows audio.
- Sample rate mismatch — When the browser and audio device operate on different audio sample rates, it causes a rendering conflict.
- Corrupted system files — System file corruption, especially in audio-related DLLs, can trigger this error consistently.
Now that you know the why, let’s tackle the how.
How to Fix Audio Renderer Error in Windows 11
Fix 1: Restart Your Computer (The Obvious First Step)
Yes, the error message itself tells you to do this — and it works more often than people admit.
A clean restart clears temporary audio session data, resets WASAPI connections, and forces Windows to re-initialize audio drivers from scratch.
Steps:
- Click the Start Menu
- Press Power > Restart (not Shut Down)
- Wait for your PC to fully restart
- Open your browser and test playback
If the error persists after a restart, move on to the next fix.
Fix 2: Replug Your Audio Device
This is one of the fastest and most underrated fixes for the audio renderer error.
When you disconnect and reconnect a headphone or speaker, Windows reassigns the audio renderer. This “soft reset” often resolves the conflict instantly.
Steps:
- Unplug your headphones or USB audio device
- Wait 10–15 seconds
- Plug it back in
- Refresh your browser tab and test
If you’re using Bluetooth audio, turn it off and back on from the taskbar or Settings > Bluetooth.
Pro Tip: Try switching the USB port if you’re using a USB headset. A different port can sometimes resolve driver assignment conflicts.
Fix 3: Disable and Re-enable Your Audio Device
Toggling your audio device through Device Manager forces Windows to re-establish the audio pipeline — often clearing the renderer error without a full restart.
Steps:
- Press Windows + X and select Device Manager
- Expand Sound, video, and game controllers
- Right-click your audio device (e.g., Realtek High Definition Audio)
- Select Disable device
- Wait 5 seconds, then right-click again and select Enable device
- Test your audio
This method is particularly effective when the error appears after waking your PC from sleep mode.
Fix 4: Update Your Audio Drivers
Outdated audio drivers are one of the top causes of the audio renderer error in Windows 11. Driver updates often include bug fixes for exactly these kinds of conflicts. Conflicts between system processes and games can also trigger issues like DBD error code 8012 Dead by Daylight, which is related to login and server instability.
Method A — Through Device Manager:
- Open Device Manager (Windows + X)
- Expand Sound, video, and game controllers
- Right-click your audio device
- Click Update driver > Search automatically for drivers
- Follow the on-screen prompts and restart
Method B — From Manufacturer’s Website:
- For Realtek: Visit the Realtek official website and download the latest HD Audio driver
- For Intel Smart Sound Technology: Visit Intel’s driver support page
- For NVIDIA HDMI Audio: Update through GeForce Experience or the NVIDIA driver package
Method C — Through Windows Update:
- Go to Settings > Windows Update > Advanced Options
- Click Optional Updates
- Check for any audio driver updates listed there
Fix 5: Roll Back Your Audio Driver
Ironically, if the audio renderer error appeared right after a Windows update or driver update, rolling back to the previous driver version often fixes it immediately.
Steps:
- Open Device Manager
- Expand Sound, video, and game controllers
- Right-click your audio device and choose Properties
- Click the Driver tab
- If Roll Back Driver is clickable (not grayed out), click it
- Select the reason and confirm
- Restart your PC
This is one of the most effective fixes when the error is update-related.
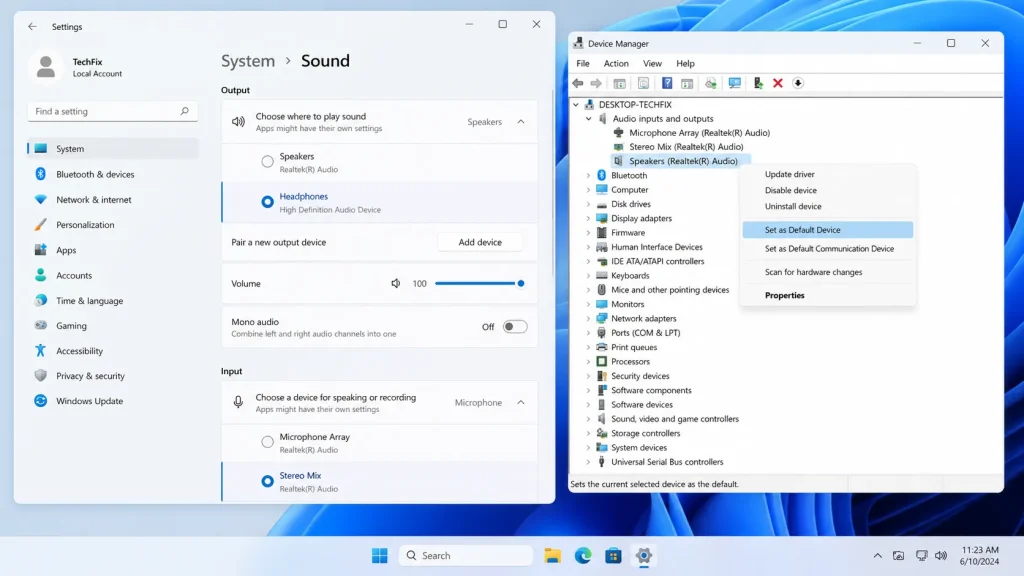
Fix 6: Set the Correct Default Playback Device
If you have multiple audio devices connected (e.g., headphones + HDMI monitor speakers + Bluetooth), Windows may be routing audio to the wrong device. Manually setting the correct default often resolves the audio renderer error.
Steps:
- Right-click the speaker icon in the taskbar
- Select Sound settings
- Under Output, choose your preferred audio device
- Scroll down and click on your device to expand settings
- Make sure it’s set as Default
You can also access the classic Sound panel:
- Press Windows + R, type mmsys.cpl, and press Enter
- Under the Playback tab, right-click your device
- Select Set as Default Device
- Click Apply > OK
Fix 7: Match Sample Rate Settings
A sample rate mismatch between Windows and your audio hardware is a surprisingly common and overlooked trigger for the audio renderer error. Browsers expect a specific sample rate; if your device is set differently, the handshake fails.
Steps:
- Press Windows + R, type mmsys.cpl, and hit Enter
- In the Playback tab, right-click your default audio device
- Select Properties
- Go to the Advanced tab
- Under Default Format, try changing the sample rate to 24-bit, 44100 Hz (Studio Quality)
- Click Test, then Apply > OK
- Restart your browser
If that doesn’t work, try 16-bit, 48000 Hz — some devices prefer this rate. Test each combination to find the one that works.
Fix 8: Run the Windows Audio Troubleshooter
Windows 11 includes a built-in audio troubleshooter that can automatically detect and repair common audio issues — including those that cause the renderer error.
Steps:
- Go to Settings > System > Troubleshoot
- Click Other troubleshooters
- Find Playing Audio and click Run
- Follow the on-screen instructions
- Apply any recommended fixes
While it doesn’t catch everything, the troubleshooter often resolves misconfigured audio sessions and service failures automatically.
Fix 9: Restart the Windows Audio Service
The Windows Audio service is the backbone of all sound output on your PC. If it crashes or gets stuck, it can cause persistent audio renderer errors — even after restarting your browser.
Steps:
- Press Windows + R, type services.msc, and hit Enter
- Scroll down and find Windows Audio
- Right-click it and select Restart
- Also, restart Windows Audio Endpoint Builder
- Close the Services window and test your audio
If the service status shows “Stopped,” right-click and select Start instead.
Bonus: Set both services to Automatic startup to prevent them from stopping after system updates.
Fix 10: Repair System Files with SFC and DISM
If none of the above methods work, corrupted system files may be the root cause. Windows 11 includes two powerful command-line tools — SFC (System File Checker) and DISM — that scan and repair corrupted OS components, including audio-related DLLs.
Step 1 — Run SFC:
- Open Command Prompt as Administrator (search CMD, right-click, Run as administrator)
- Type: sfc /scannow
- Press Enter and wait for the scan to complete (may take 10–15 minutes)
- Restart if any repairs were made
Step 2 — Run DISM:
- In the same elevated Command Prompt, type: DISM /Online /Cleanup-Image /RestoreHealth
- Press Enter and let it run
- Restart your PC afterward
These tools address corruption at the OS level that driver updates and troubleshooters cannot reach.
Bonus Tip: Disable Exclusive Mode for Your Audio Device
Some applications claim exclusive control over your audio device, blocking browsers from accessing it. Disabling this feature often resolves audio conflicts.
Steps:
- Open mmsys.cpl (Windows + R > type mmsys.cpl)
- Right-click your default playback device > Properties
- Go to the Advanced tab
- Uncheck Allow applications to take exclusive control of this device
- Click Apply > OK
This is especially helpful if you use software like Discord, Spotify, or DAW applications alongside your browser.
Quick-Reference: Which Fix Should You Try First?
| Situation | Best Fix to Try First |
| The error just appeared randomly | Fix 1 (Restart) or Fix 2 (Replug) |
| Error after Windows/driver update | Fix 5 (Roll Back Driver) |
| Multiple audio devices connected | Fix 6 (Set Default Device) |
| Error on YouTube only | Fix 3 (Disable/Re-enable Device) |
| Persistent error, nothing works | Fix 10 (SFC + DISM) |
| Error after waking from sleep | Fix 9 (Restart Audio Service) |
Final Thoughts
The audio renderer error in Windows 11 can sound intimidating, but it’s almost always fixable within minutes. Start with the simple fixes — restart your PC, replug your audio device, or toggle it in Device Manager. If those don’t work, updating or rolling back your audio driver solves the problem for most users.
For stubborn cases, correcting your sample rate settings, restarting the Windows Audio service, or running SFC/DISM provides a deep-level repair that gets your audio back on track permanently.
The key takeaway: this is a software problem, not a hardware one. You don’t need to buy new speakers or headphones — you just need the right fix.
Bookmark this guide so you can return to it any time the error reappears, and share it with anyone who’s stuck with the same frustrating audio issue.