How to Compress a Video on iPhone: The Complete 2026 Guide
You just filmed something brilliant — a toddler’s first steps, a sunset that looks almost too cinematic, a short clip for a client pitch. Then you try to send it. The file is 1.2 GB. The email bounces—the WhatsApp upload stalls. Sound familiar?
Modern iPhones are phenomenal cameras. The same hardware that shoots 4K ProRes footage at 60fps also happens to live in your pocket — and it generates files that can swallow your storage whole. Knowing how to compress a video on iPhone is no longer optional knowledge; it’s a practical skill every iPhone owner needs in 2026.
This guide covers six distinct methods, from adjusting camera settings before you even press record, to using third-party apps, to leveraging iCloud’s quiet transcoding magic. Each method suits a different situation, time budget, and acceptable quality trade-off. By the end, you’ll know exactly which approach fits your workflow. If you’re working with large files, you might also need the best clipping software tools to manage and optimize media efficiently.
1. Why Video File Size Matters on iPhone
Storage Limits and the Modern iPhone Reality
Even the most capacious 1TB iPhone Pro model feels finite when you’re shooting 4K at 60fps. A single minute of 4K HDR at 60fps on H.264 can clock in at roughly 400MB. Shoot a ten-minute event, and you’ve consumed 4GB before editing a frame. For users on the base 128GB model, still the most popular tier, this arithmetic becomes urgent very quickly.
Compression solves two problems simultaneously: it frees on-device storage, and it reduces the bandwidth cost of sharing. Neither benefit is trivial. Choosing the right storage also matters—especially if you’re using high-speed drives like those compared in Samsung EVO vs PRO SSD.

Sharing Bottlenecks: Email, iMessage, and Social Platforms
Platform-imposed size limits haven’t kept pace with camera improvements:
- Gmail and Outlook cap attachments at 25 MB and 20 MB, respectively.
- WhatsApp limits video files to 64MB before compression kicks in automatically — often with jarring quality loss.
- Instagram Reels have a 1GB limit, but their own re-encoding pipeline is aggressive and unpredictable.
- iMessage transcodes videos above a certain size, degrading quality without warning.
Compressing on your terms, before sharing, means you control the quality outcome rather than delegating it to a platform’s blunt algorithm.
2. Understanding iPhone Video Formats and Codecs
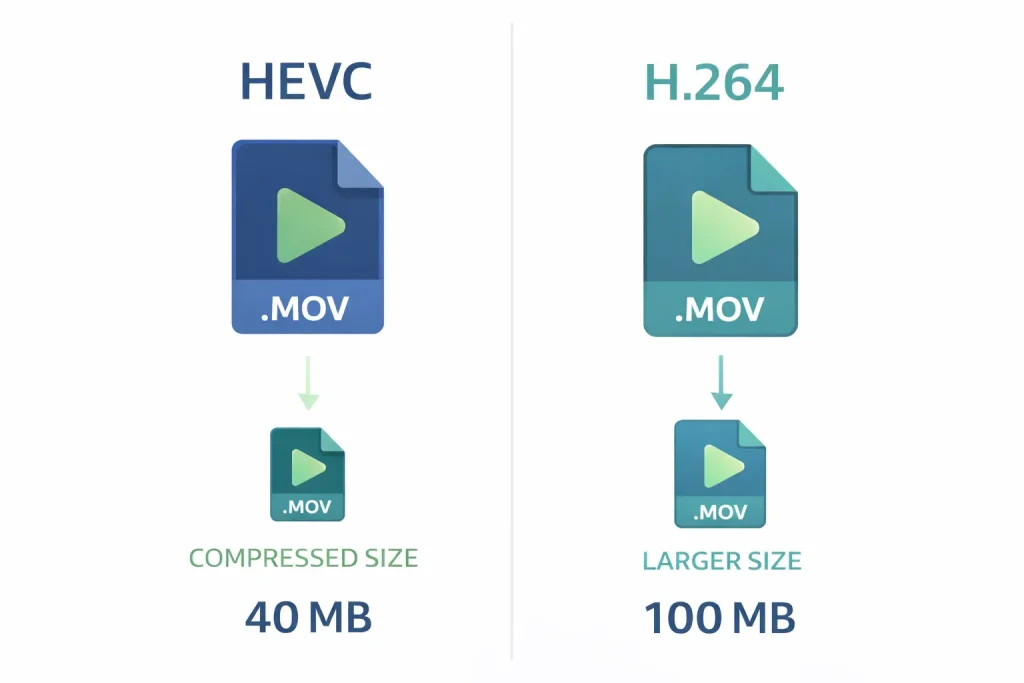
HEVC vs H.264: Which One Saves More Space?
Your iPhone can record in two main codecs: H.264 (also called AVC) and HEVC (H.265). HEVC is Apple’s default since iOS 11, and for good reason — it delivers roughly the same perceptual quality as H.264 at about half the file size. The trade-off is minor: HEVC files are slightly less compatible with older devices and editing software, though modern platforms handle them without issue.
A 4K 30fps clip that runs one minute will typically occupy around 170MB in HEVC versus 350MB in H.264. That’s a meaningful difference when multiplied across dozens of clips.
ProRes and Cinematic Mode: When Quality Has a Cost
ProRes, introduced with the iPhone 13 Pro, is a professional broadcast-grade format. It’s essentially uncompressed by consumer standards — a single minute of 4K ProRes at 30fps consumes approximately 6GB. It exists for professional workflows where footage will be color-graded and processed in post. If you’re shooting ProRes casually, compression becomes not just useful but necessary. Cinematic Mode adds depth-of-field metadata that further inflates file size, something worth monitoring before a long shoot.
3. Method 1 — Change Camera Settings Before Recording
The most elegant form of compression is prevention. Choosing lower-fidelity settings before recording produces a smaller file inherently, without any post-processing tax on quality.
Choosing the Right Resolution and Frame Rate
Navigate to Settings → Camera → Record Video. Here you’ll find a spectrum of options ranging from 720p HD at 30fps all the way to 4K at 60fps (or 120fps for slow motion). Each step down in resolution roughly halves the file size:
- 1080p at 30fps — the sweet spot for casual sharing. Excellent quality, universally compatible, modest file size (~130MB/min).
- 1080p at 60fps — smoother motion, ~200MB/min. Good for action footage, you won’t necessarily slow down.
- 4K at 30fps — cinematic look, ~350–400MB/min. Best reserved for footage you intend to edit.
- 720p at 30fps — highly compact (~40MB/min), suitable for drafts, internal reviews, or reference clips.
Enabling HEVC High-Efficiency Format
Go to Settings → Camera → Formats and select High Efficiency. This switches recording from H.264 to HEVC, cutting file sizes approximately in half with negligible visible quality difference at normal viewing distances. If you’ve been on Most Compatible — often the default after a device restore — this single change is the easiest compression win available.
Pro tip: Set High Efficiency as your default and only switch to Most Compatible when sending footage to someone using Windows editing software from 2016 or earlier. Modern tools on every platform handle HEVC without issue.
4. Method 2 — Use the Photos App to Reduce Video Size
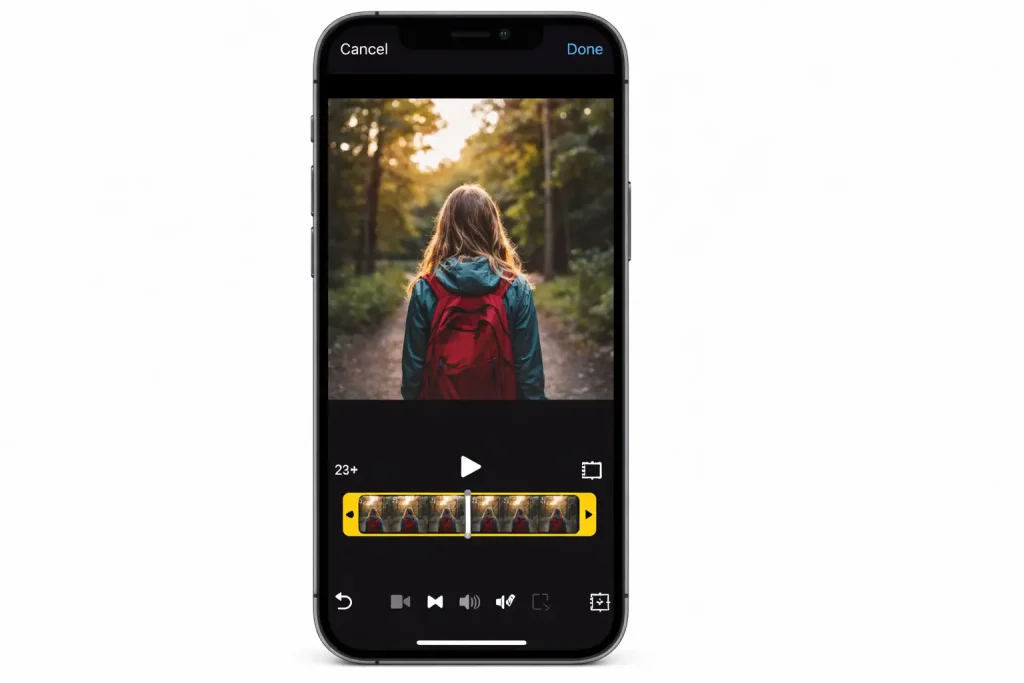
Trimming Clips to Remove Unnecessary Footage
File size is, at its core, a product of duration. The Photos app’s built-in trim tool is underused as a compression strategy. Open any video, tap Edit, and drag the yellow handles on the timeline to cut the clip to its essential duration. A 4-minute casual recording often holds 90 seconds of actually watchable content. Trimming before export can eliminate 60–70% of a file’s size without touching a codec. You can also explore best Zapier alternatives to automate video workflows without manual effort.
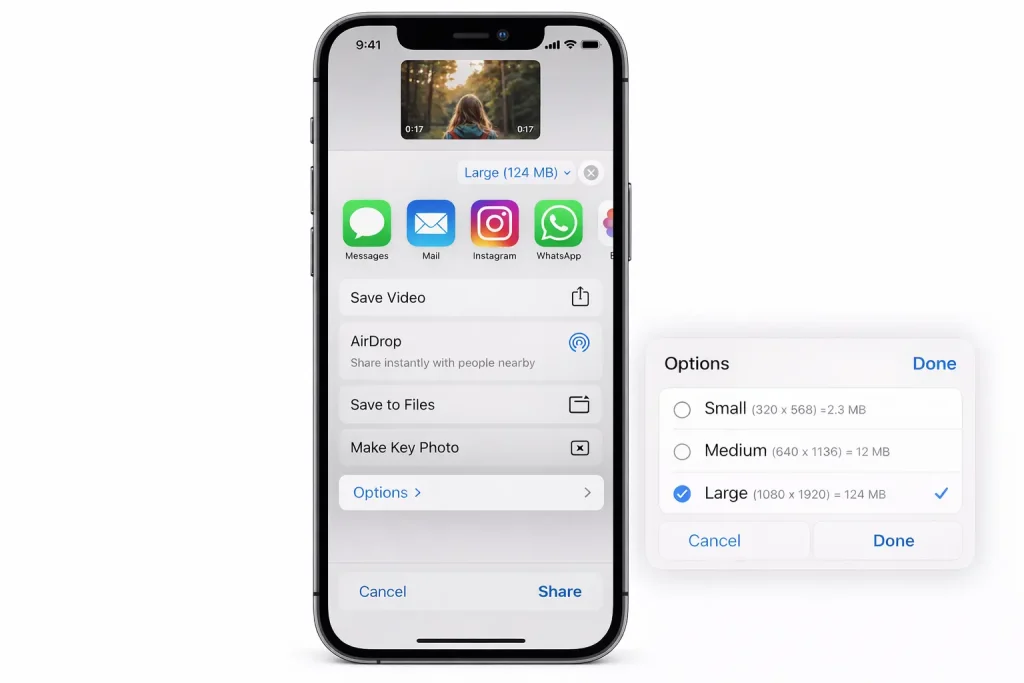
Exporting with Lower Resolution via Share Sheet
When you tap the Share button on a video in Photos, iOS will sometimes prompt you to choose a quality level, particularly for 4K content. Select Medium or Smallest to export a transcoded version at 1080p or lower. This doesn’t alter the original file stored in your library. It creates a new, compressed copy for the specific share action only, which is an elegant approach when you want to preserve the original.
5. Method 3 — Compress Video on iPhone Using iMovie
Apple’s free iMovie app offers granular export control that the Photos app lacks. It’s particularly useful for videos you want to edit and compress in a single workflow.
Step-by-Step: Export at Medium or Low Quality
- Open iMovie and create a new Movie project.
- Import your clip from your photo library.
- Make any desired edits — trim, cut, adjust colour.
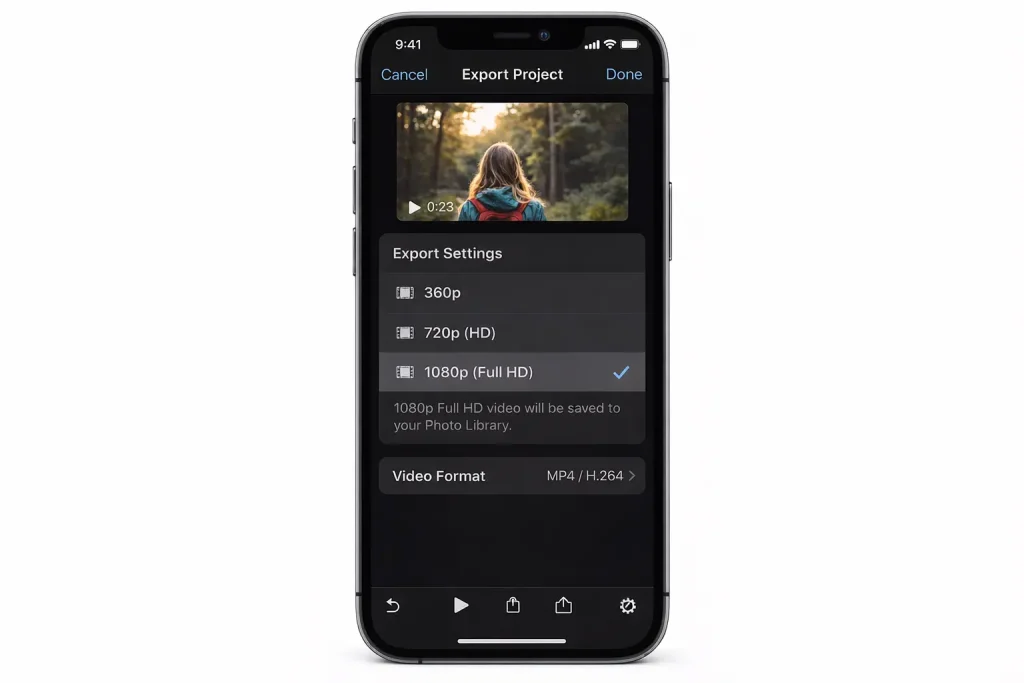
- Tap the Share button (the box with an arrow) and choose Save Video.
- A quality selector appears: Medium (360p), Large (540p), HD (720p), or Full HD (1080p). For maximum compression, choose Medium or Large.
Note that iMovie re-encodes in H.264 by default, which may actually increase file size compared to an HEVC original if you select a high resolution. For most sharing purposes, 720p from iMovie strikes an excellent balance between compatibility and compactness.
iMovie is best when you want editing control alongside compression. If you only need to compress without editing, the Photos share sheet or a third-party app will be faster.
6. Method 4 — Use the Files App and Built-In Compression
Less commonly known: iOS’s Files app supports direct video compression through a simple long-press workflow. This feature works particularly well for videos already saved to iCloud Drive or local storage.
- Open the Files app and navigate to the video you want to compress.
- Long-press the video file to reveal the contextual menu.
- Tap Compress. iOS creates a .zip archive of the file.
A caveat: ZIP compression applied to already-compressed video formats like HEVC or H.264 yields minimal size reduction — often less than 5%. This method is more useful for raw formats or for bundling multiple files for email. For genuine video transcoding, other methods in this guide are more effective.
7. Method 5 — Third-Party Apps That Compress iPhone Videos
When native tools fall short, the App Store offers several capable solutions. The best ones give you explicit control over bitrate, resolution, and codec parameters that Apple’s own apps abstract away.
Video Compress — Shrink Video App
This is consistently among the highest-rated compression utilities on the App Store. Its interface is direct: select a video, choose a target resolution and quality level using a slider, preview the estimated output size before committing, and export. It handles batches, supports HEVC output, and preserves metadata. For users who compress videos regularly, it pays for itself in time saved within a week.
HandBrake via Mac Continuity
If you have a Mac nearby, HandBrake — the industry-standard open-source encoder — is accessible through iPhone’s AirDrop pipeline. AirDrop the raw file to your Mac, run it through HandBrake with a preset like Fast 1080p30, and AirDrop the compressed result back. This takes under five minutes for most clips and produces exceptional quality-to-size ratios because HandBrake’s x265 encoder is more sophisticated than what iOS applies natively.
Claquette and Other Lightweight Options
Claquette is a macOS and iOS GIF and video conversion tool that also handles compression elegantly. For simpler needs, apps like Compress Videos & Resize Video and Video Slimmer offer one-tap workflows suitable for users who want compression without configuring anything manually.
8. Method 6 — Compress via Cloud Services
iCloud, Google Drive, and Automatic Transcoding
Uploading a video to a cloud service and sharing the link rather than the file itself is a compression workaround that often goes unconsidered. Google Drive and iCloud Drive both serve video through adaptive streaming when the link is accessed in a browser — the recipient downloads only the quality level their connection and screen resolution require.
Additionally, when you share an iCloud video link, Apple transcodes the video server-side into HLS (HTTP Live Streaming) format. This means the original 4K file on your device is never transmitted wholesale; the recipient streams a version appropriate for their device. For sharing with family or clients who just need to watch something once, this approach combines maximum convenience with zero manual compression effort.
9. Compression Settings Comparison Table
| Method | Approx. Size Reduction | Quality Impact | Effort Required | Best For |
| Switch to HEVC | ~50% | Minimal | One-time setting | All daily recording |
| Lower resolution (1080p) | 40–75% | Moderate | Low | Casual sharing |
| Photos trim + share | Variable | Depends on trim | Low | Quick shares |
| iMovie export (720p) | 60–80% | Noticeable at 360p | Medium | Edited clips |
| Third-party app | Up to 90% | Tunable | Medium | Frequent compressors |
| Cloud link share | N/A (no download) | None | Very low | View-only sharing |
10. How Much Space Can You Actually Save?
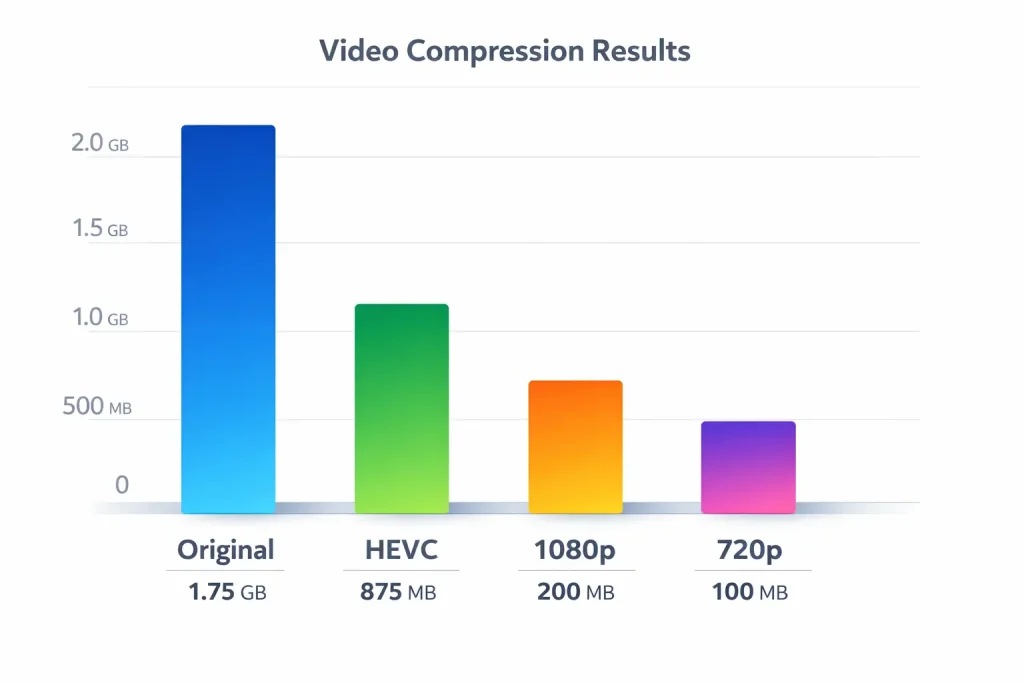
To make this concrete: a 5-minute 4K 60fps clip recorded in H.264 runs approximately 1.75GB. Here’s what applying different methods yields:
- Switch to HEVC, same resolution and frame rate: ~875MB — a 50% reduction immediately.
- HEVC + drop to 1080p 30fps: ~200MB — an 88% reduction with very acceptable quality for most uses.
- Third-party app at 720p, medium bitrate: ~80–120MB — a 93–95% reduction, acceptable for social media or internal communication.
- iMovie at 360p (Medium): ~25MB — suitable for draft reviews or audio-first content where visual fidelity is secondary.
The takeaway: a 1.75GB clip can realistically become a 200MB clip with settings changes alone, no app required, at a quality level that most human viewers on a phone screen cannot distinguish from the original.
11. Compressing Without Losing Quality: Tips and Trade-offs
There is no lossless video compression that meaningfully reduces file size. Every method in this guide trades some quality for some size. The art is in making that trade deliberately. A few principles help:
- Match resolution to viewing context. A video destined for a smartphone screen doesn’t need 4K. The resolution advantage of 4K is only perceptible on screens larger than about 40 inches viewed at close distance.
- Prioritise frame rate cuts over resolution cuts. Dropping from 60fps to 30fps halves the data load while preserving apparent sharpness. Most human motion looks fine at 30fps for non-sports content.
- Compress for the destination, not the source. If a video is uploaded to Instagram or YouTube, those platforms re-encode anyway. Uploading a huge original doesn’t improve the final viewer experience; it just costs you upload time and bandwidth.
- Keep the original. Compression is destructive. Never delete the original until you’ve confirmed the compressed version meets your needs.
If you shoot in 4K for editing purposes, keep the 4K master in iCloud and share a 1080p or 720p export. You get both archival fidelity and practical shareability.
Conclusion
Compressing a video on iPhone is less about choosing a single right method and more about matching a method to a moment. Switching to HEVC is the foundation — do it once and benefit forever. Using the Photos share sheet handles one-off situations quickly. iMovie covers edited content. Third-party apps serve power users and recurring workflows. Cloud links handle the cases where you want zero quality compromise, and the recipient just needs to watch something once.
The iPhone in your pocket is one of the most capable cameras ever made. Managing what it produces shouldn’t require expertise — just awareness of the tools already available to you. Armed with these six methods, you can move from a 1.7GB liability to a 200MB shareable asset in under two minutes, without ever second-guessing whether the quality trade-off was worth it.
Start with the simplest change — enable HEVC today — and work your way up to the more nuanced tools only when a specific situation demands it. That’s the most efficient path through a problem that has, thankfully, a lot of very good solutions